The Situation
Towards the end of 2024, Epson ceased producing OEM ink cartridges for my Epson R2880 printer. Since I also use a newer P900, I decided to convert the R2880 into a dedicated black-and-white printer. While the P900's ABW mode is excellent and offers flexibility in toning, I was curious whether I could set up the R2880 to print with various shades of gray. If successful, this would give me a printer dedicated to black-and-white images, using almost exclusively carbon black pigment, which I find appealing for its longevity.
To achieve this, I decided to use Paul Roark's Glossy Carbon Variable Tone (GCVT) ink system. This formulation includes a bluish toner ink that allows for adjustable print tones, ranging from warm to cold — a feature that was important to me. Additionally, the ink set is compatible with both matte and glossy papers. However, using this ink system is somewhat more complex compared to simpler carbon ink systems, such as those offered by Farbenwerk.
Getting Things Ready
In the first step, I acquired the necessary inks (referencing Paul Roark’s PDF document), tools, and refillable auto-reset ink cartridges (ARCs) from OctoInkjet. Using a sufficiently accurate scale (with a nominal precision of 0.01g), I prepared the required dilutions of the black inks (both matte and glossy). I started with 50mg of ink for each color channel, as I was unsure whether this experiment would succeed. The R2880 ink cartridges have a capacity of approximately 13g. Since I received Type III cartridges, priming was necessary before their first use; Type IV cartridges apparently do not require priming. Detailed instructions for this process are available online.
After priming the first cartridge, I became more comfortable with the procedure and proceeded to prime the remaining cartridges. Once all ARC cartridges were prepared, I removed the OEM cartridges entirely. I chose not to clean the inlets to the print head, as I was concerned about introducing small solid contaminants that could cause issues. Next, I inserted all the refillable cartridges, except for the K cartridge (in my case, MK), which was inserted last. A nozzle check confirmed that everything was functioning properly, and the shift to gray inks was already visible in the test print colors. Following this, I performed two head cleanings, after which the printer appeared ready for use.
A First Test

As an initial test, I printed Keith Cooper’s black-and-white test image using Quad Tone Rip (QTR) on an A4 sheet of Hahnemühle Photo Rag 308. The quad file controlling the ink flow, GCVT-Pa325-warm-carb.quad, was provided by Paul Roark. This quad was originally created for printing on Premier Art Fine Art Smooth Hot Press paper using an Epson 7800. Upon examining the circular gray scale section of the test image with a loupe, I noticed slight color variations. These tonal shifts were also visible in the light-to-dark transitions in other parts of the test image. I suspected these variations were due to residual OEM color ink in the print head.
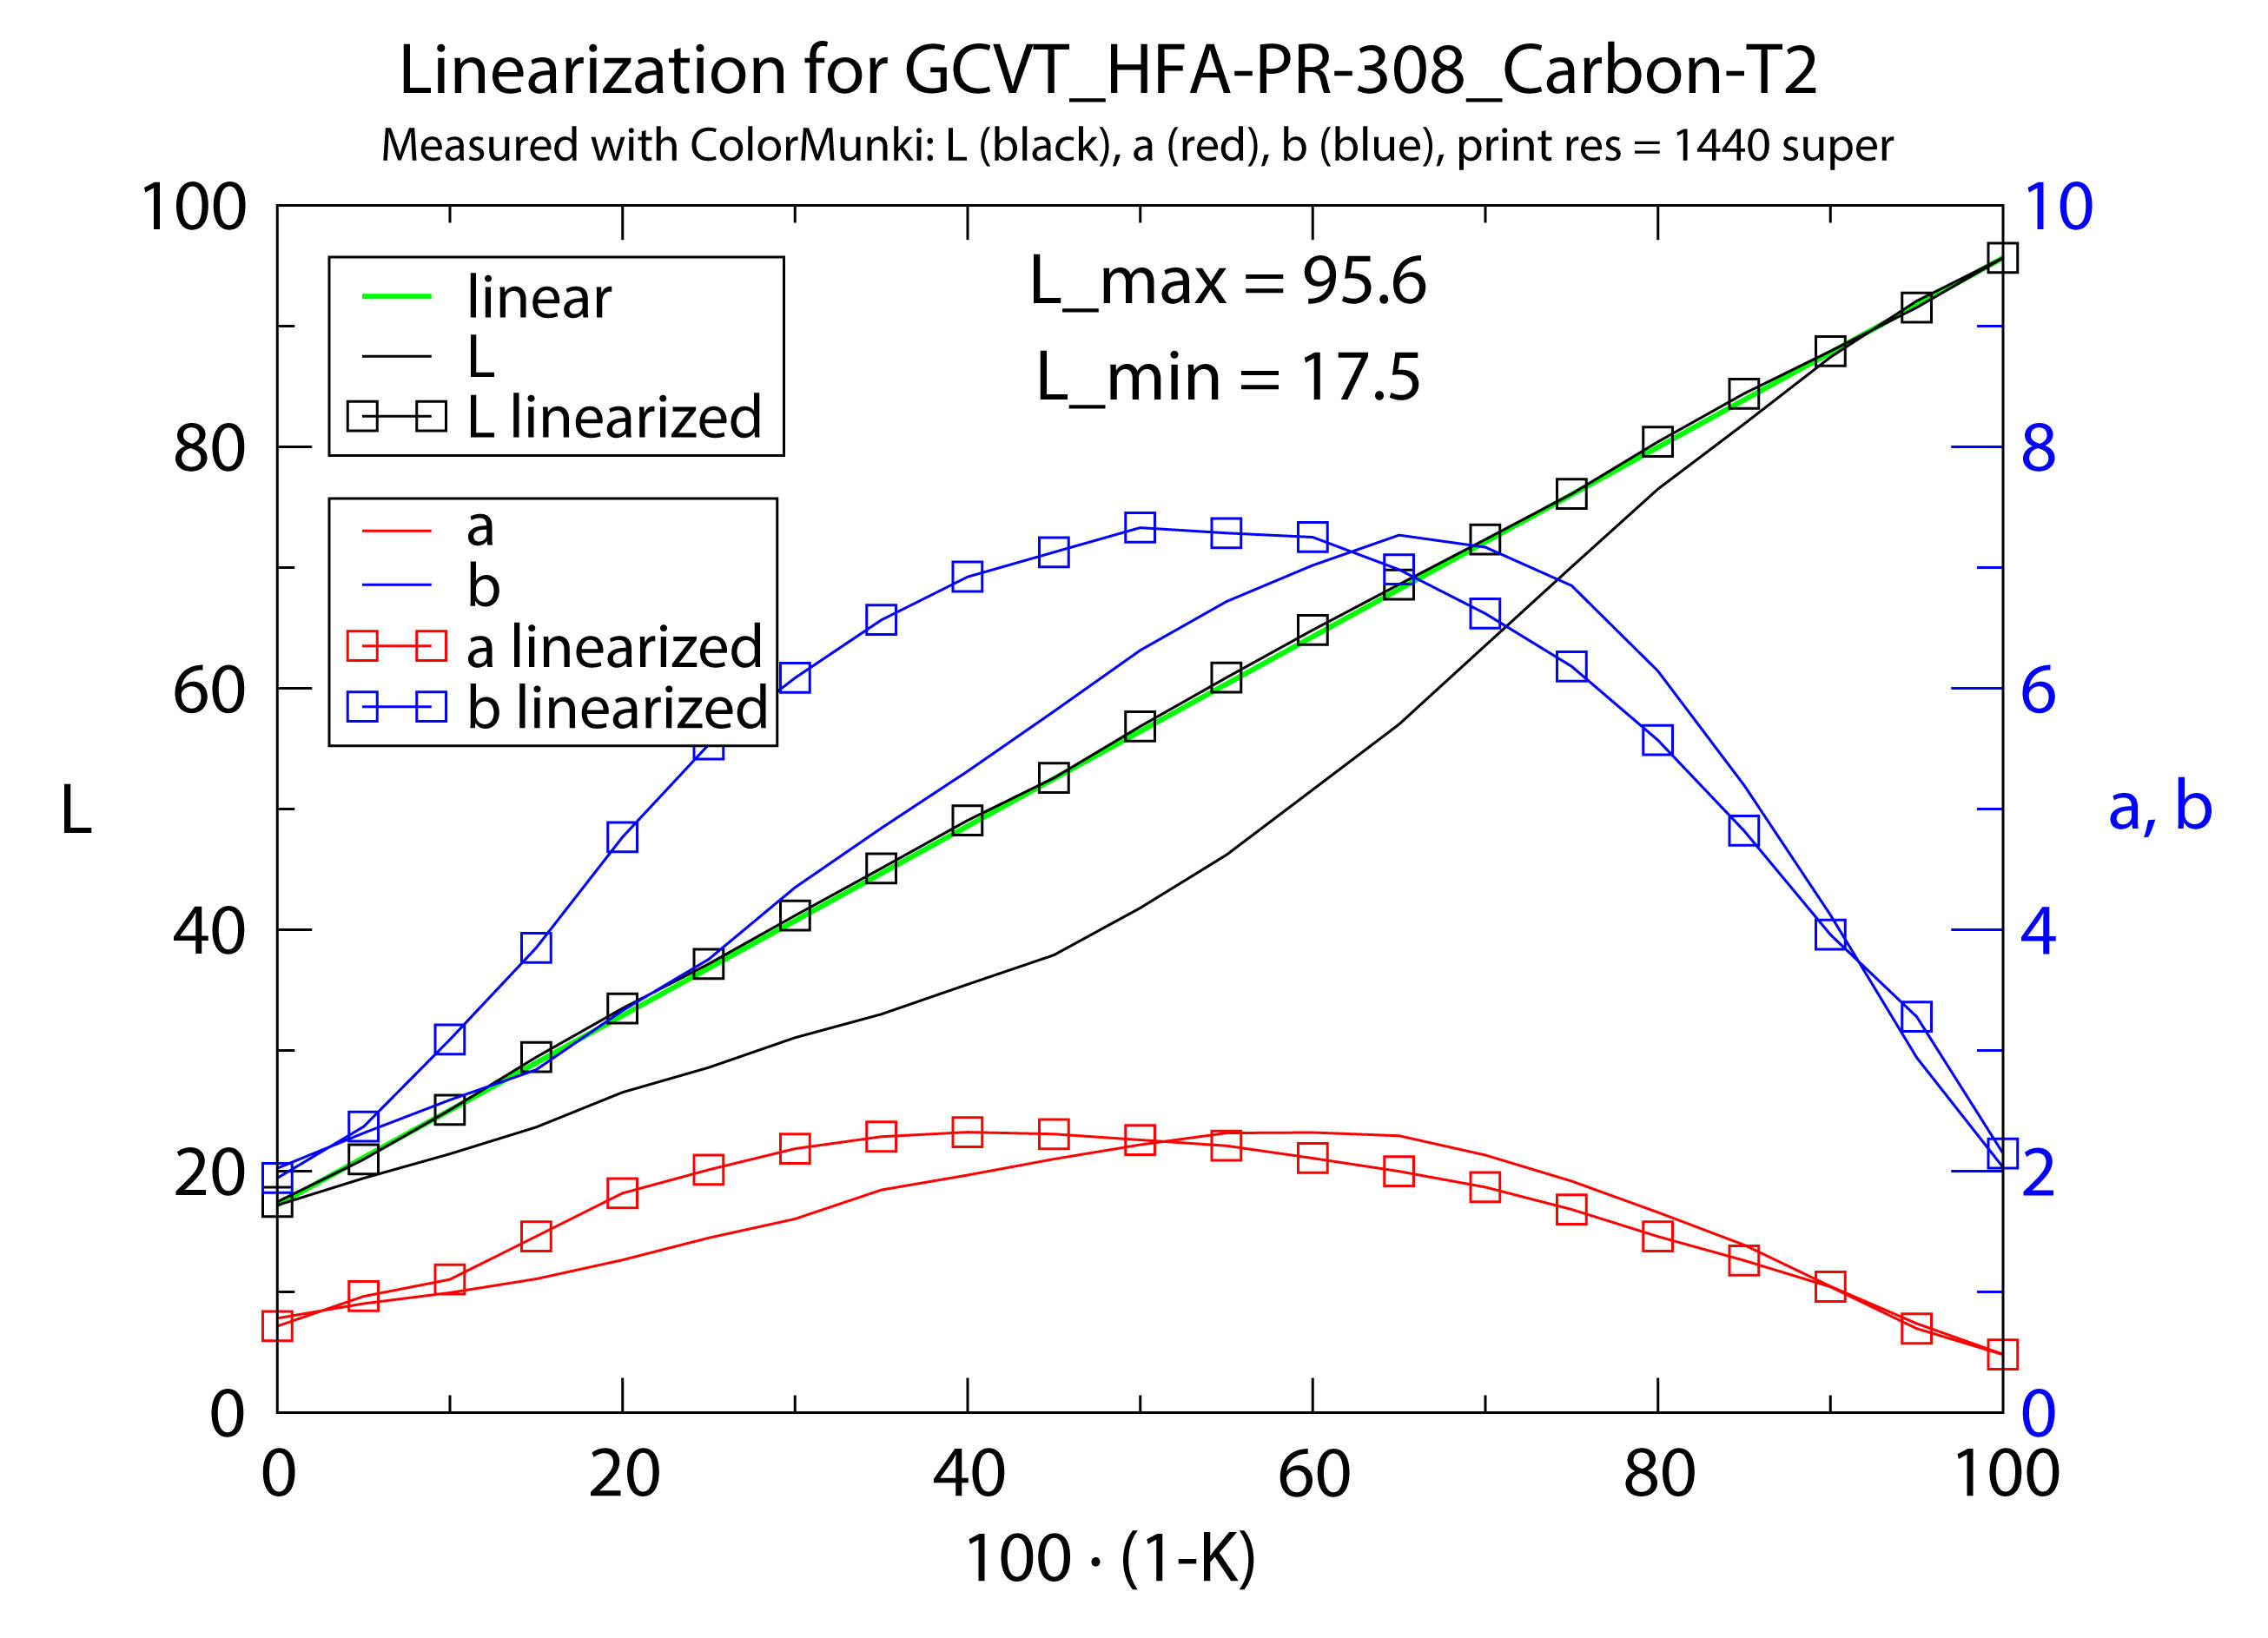
To quantify this effect, I prepared a black-and-white test image consisting of a 3x3cm square with the Lab color value Lab = (40,0,0). I printed the square using only a single color channel (C, LC, M, or LM) by modifying the quad file. Specifically, I eliminated all but one color channel in the ink descriptor file. The results, represented as circles, are shown in figure 1. Ideally, the Lab values (a,b) of the printed patches should be identical. However, after two head cleanings, the results still showed unacceptable scatter, particularly in the a value. A third head cleaning significantly improved the consistency, reducing the ΔE to approximately 1. This level of scatter is acceptable and is expected to improve further with continued printing. On Hahnemühle Photo Rag 308 (matte), the pure carbon ink exhibits a slightly brownish tone with maximum Lab values near (a,b) ≈ (2.5, 8.5), as shown in figure 3a below.
A Small Stumbling Block
Initially, I noticed that Quad Tone Rip (QTR) placed the image on the paper offset from the specified position. After some testing, I discovered that the issue was caused by using a decimal comma instead of a decimal point system-wide on Windows 10. Once I switched to the decimal point, the placement worked perfectly. The confusion arose because the GUI component of QTR handles the decimal comma correctly and displays the image position accurately in its (tiny) preview field, giving the impression that everything is functioning as expected. However, the position data from the GUI is passed internally to the core program, which apparently only interprets values in inches and with a decimal point. When image positions are specified in millimeters with a decimal comma, the data is first converted to inches, and any decimals are disregarded. As a result, the image appears only at integer inch positions relative to the upper-left corner of the paper.

Serious Printing
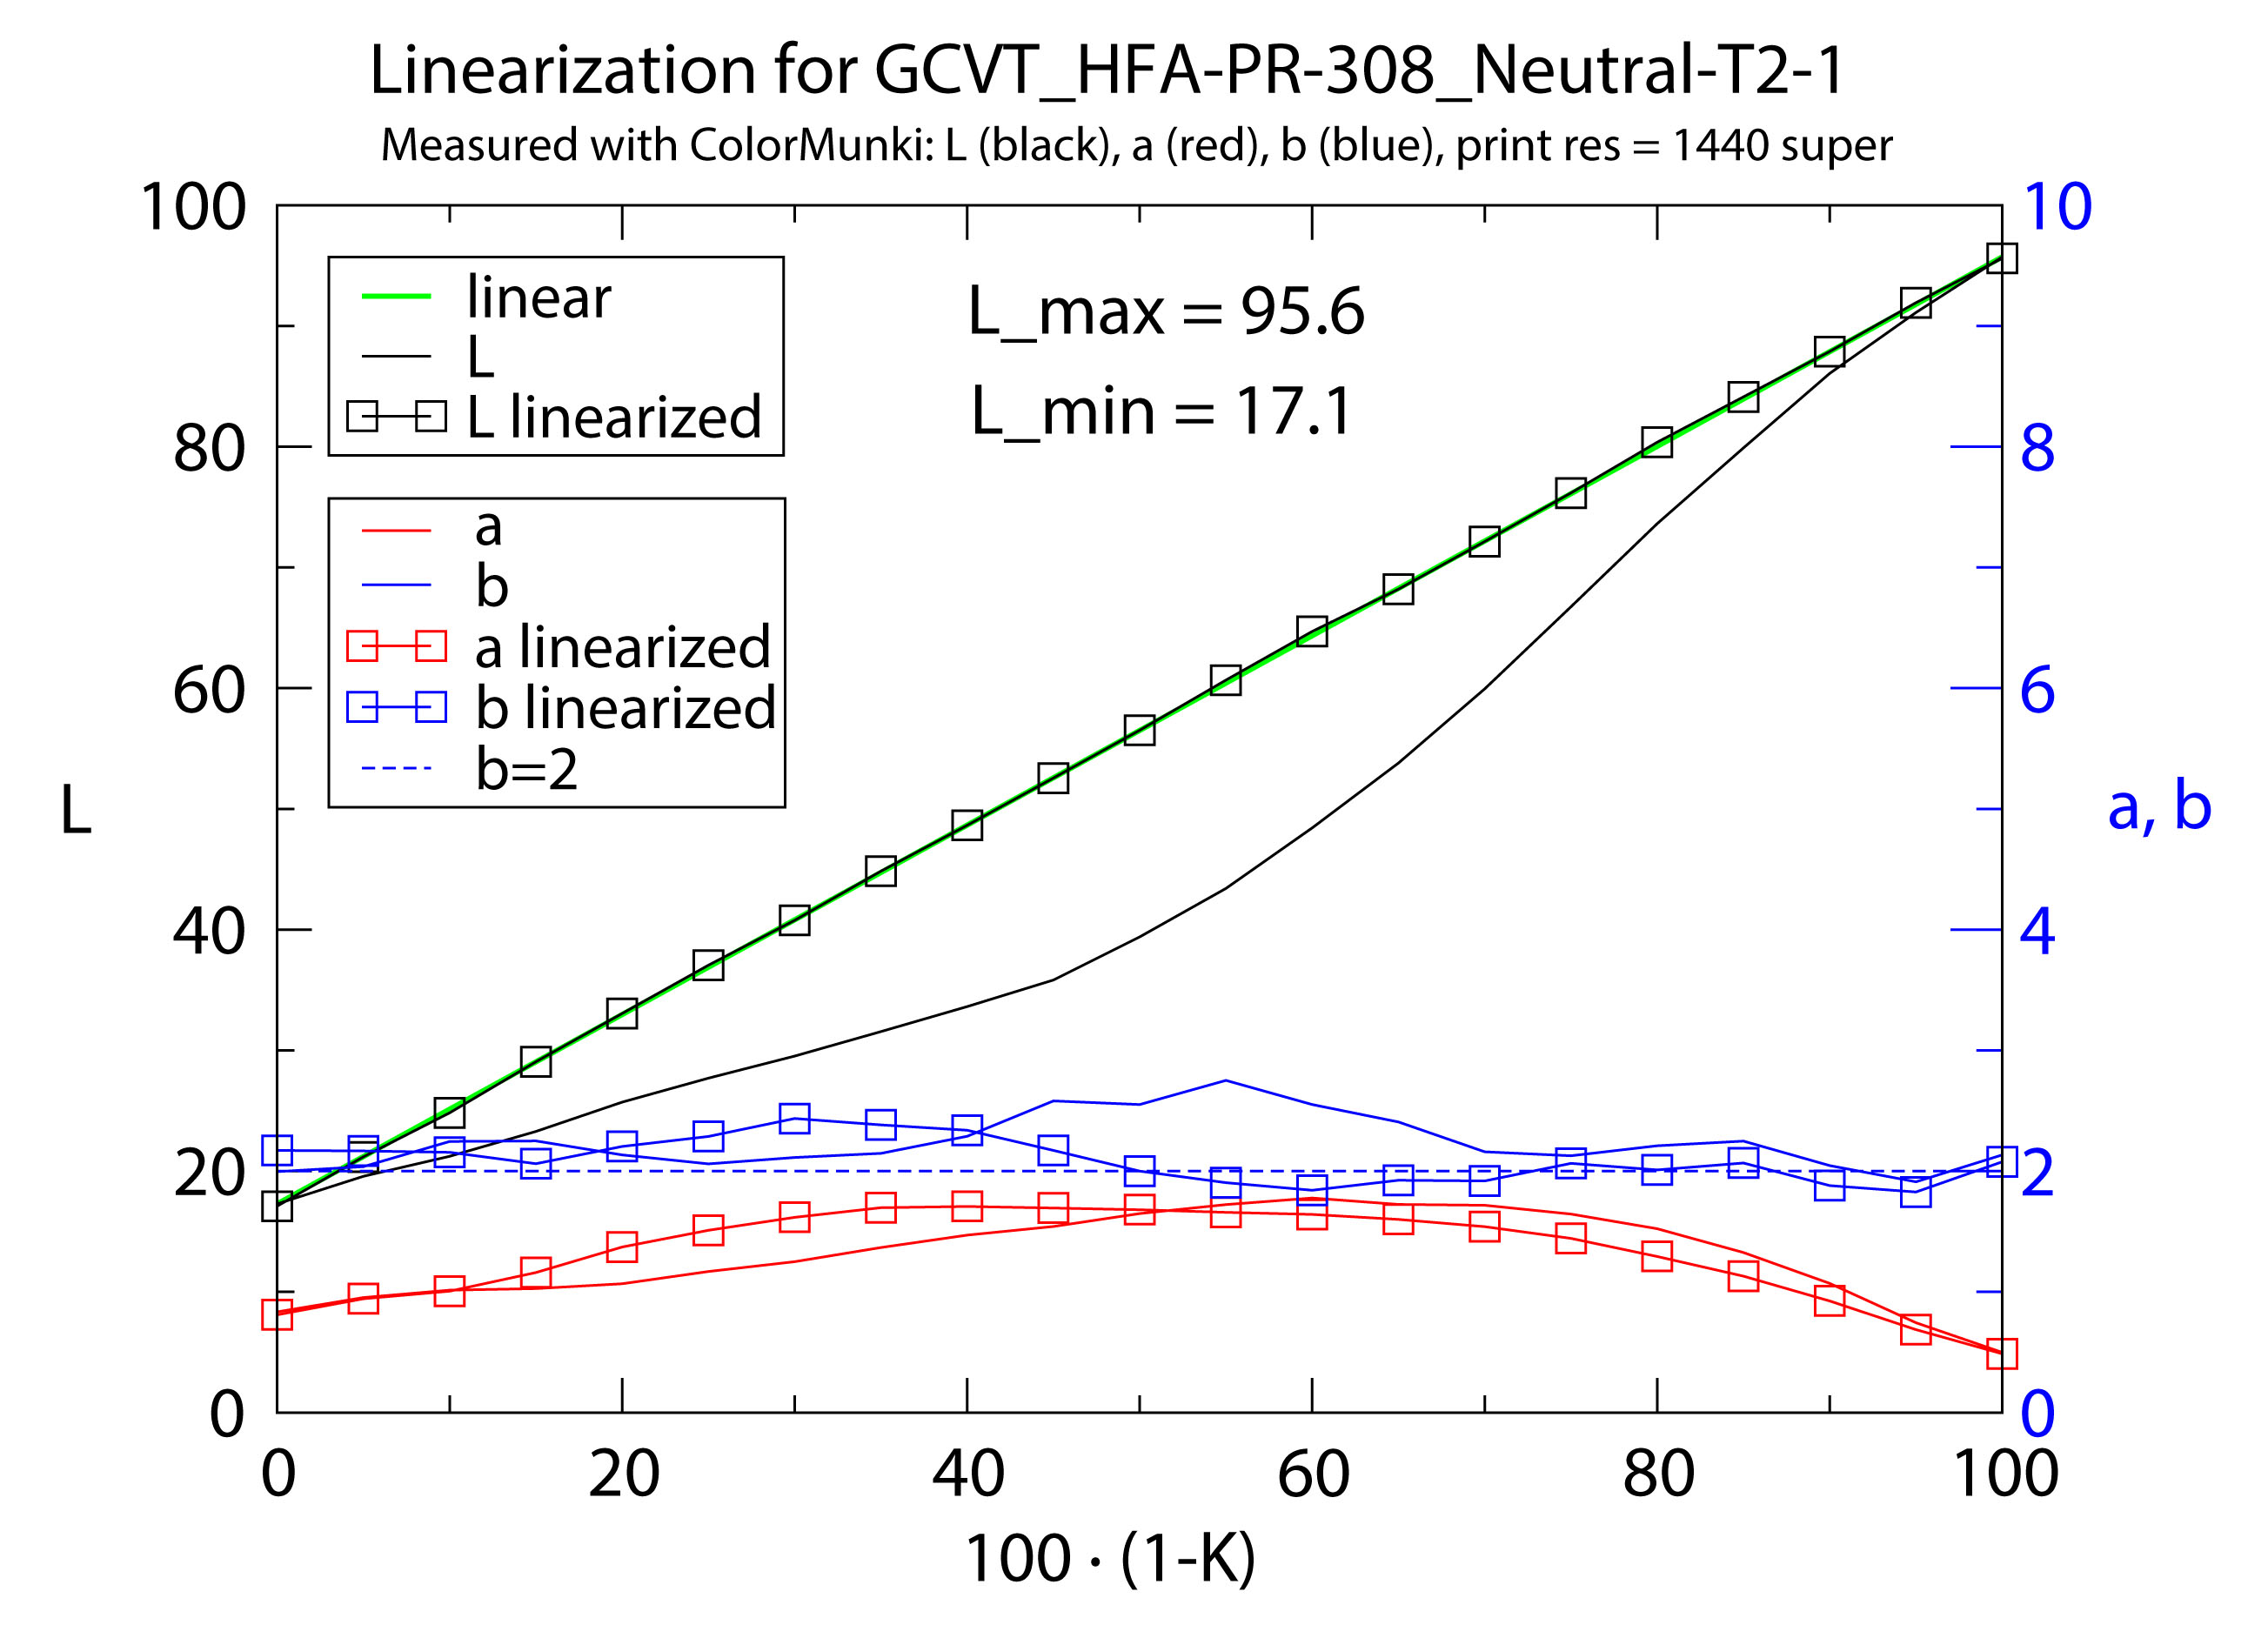
Before venturing into the process of creating quad files from scratch, I first modified existing profiles (ink descriptor files) provided by Paul Roark. I removed the linearization data from these profiles and printed a 21-step gray wedge (figure 2) on both matte and glossy paper types similar to those for which the profiles were originally created. After allowing the prints to dry for a day, I measured the Lab values of the 21 fields using the color picker mode of my ColorMunki Photo spectrophotometer. The measured L values were then entered into the linearization tab of QTR. With the ink descriptor profile adjusted for the R2880 and the specific paper, I reprinted and remeasured the step wedge. In all cases tested (see table), the corrected profiles yielded an almost perfectly linear L response.
Here are the names of the profiles of Paul Roark which linearized successfully for three Hahnemühle (HFA) papers.
| HFA Photo Rag 308 | HFA Photo Rag Pearl | HFA Fine Art Baryta |
|---|---|---|
| GCVT-Pa325-warm-carb | GCVT-Canson-Baryta-Carbon | GCVT-Canson-Baryta-Carbon |
| GCVT-Pa325-Carbon-T2 | GCVT-RR-UPSatin-carb | GCVT-RR-UPSatin-carb |
| GCVT-Pa325-Neutral-T2-1 | GCVT-Canson-Baryta-Neutral | GCVT-Canson-Baryta-Neutral |
| GCVT-RR-UPSatin-Neutral | GCVT-RR-UPSatin-Neutral |
|
|
Figure 3 illustrates the measurements for a pure Carbon profile (a) and a neutral profile (b). The linearity of the L values is excellent in both cases, even though the non-linearized profiles produced prints that were too dark (black lines). For the pure Carbon profile, the mid-tones exhibit a color near (a, b) ≈ (2, 7). In contrast, the neutral profile's mid-tones are slightly warm, with (a, b) ≈ (1.5, 2). The positive a ≈ 2 > 0 reflects the inherent nature of the carbon pigment. A colder (more blue) tint can be achieved by adjusting the amount of blue toner in the mix.
I was pleasantly surprised by the results when printing a photo on Hahnemühle Fine Art Baryta using two curves in QTR: a 100% neutral curve for highlights and mid-tones, and a 100% Carbon curve for the shadows. The resulting print closely resembled a strongly selenium-toned silver-gelatin print, reminiscent of my days working in the wet darkroom.
A Little Disappointment
For the Epson R2880, a minor drawback is the micro-banding effect reported by Brian Stewart. This is a property of the printer which is eliminated only by the Epson printer driver. When printing with QTR, this artifact appears approximately 1 inch from both the leading and trailing edges of the paper. This is annoying when printing on smaller-format papers. Luckily, I could not detect the micro-banding when printing on Hahnemühle Photo Rag 308 at a resolution of 1440-super dpi (used for figure 3). I found that 1440-super dpi also yields deeper blacks on this paper (Lmin ≈ 18) as compared to the higher resolution of 2880-super dpi (Lmin ≈ 21). However, on glossy paper such as Hahnemühle Fine Art Baryta, the micro-banding is faintly visible at resolution 1440-super dpi. At the higher 2880-super dpi resolution, which is generally preferable for glossy or satin papers, the micro-banding becomes more noticeable.
A Note on Refilling Cartridges for the R2880
OEM cartridges for the Epson R2880 should contain 11.4ml of ink. My K cartridge was filled with 13.57g of MK ink. Assuming a density of 1.08, this would amount to a volume of 12.5ml. But when the printer reported an empty K cartridge, it really looked empty. After refilling and reinserting cartridge the nozzle check showed practically no K at all. It turned out that the cartridges had to be primed once again. After that, the K channel was re-established. Therefore, it seems useful to replace ALL cartridges by full ones (from a second set) every time the printer reports an empty cartridges. This way one can hope to avoid that the ink level in any cartridge gets to low.
Building a profile from scratch
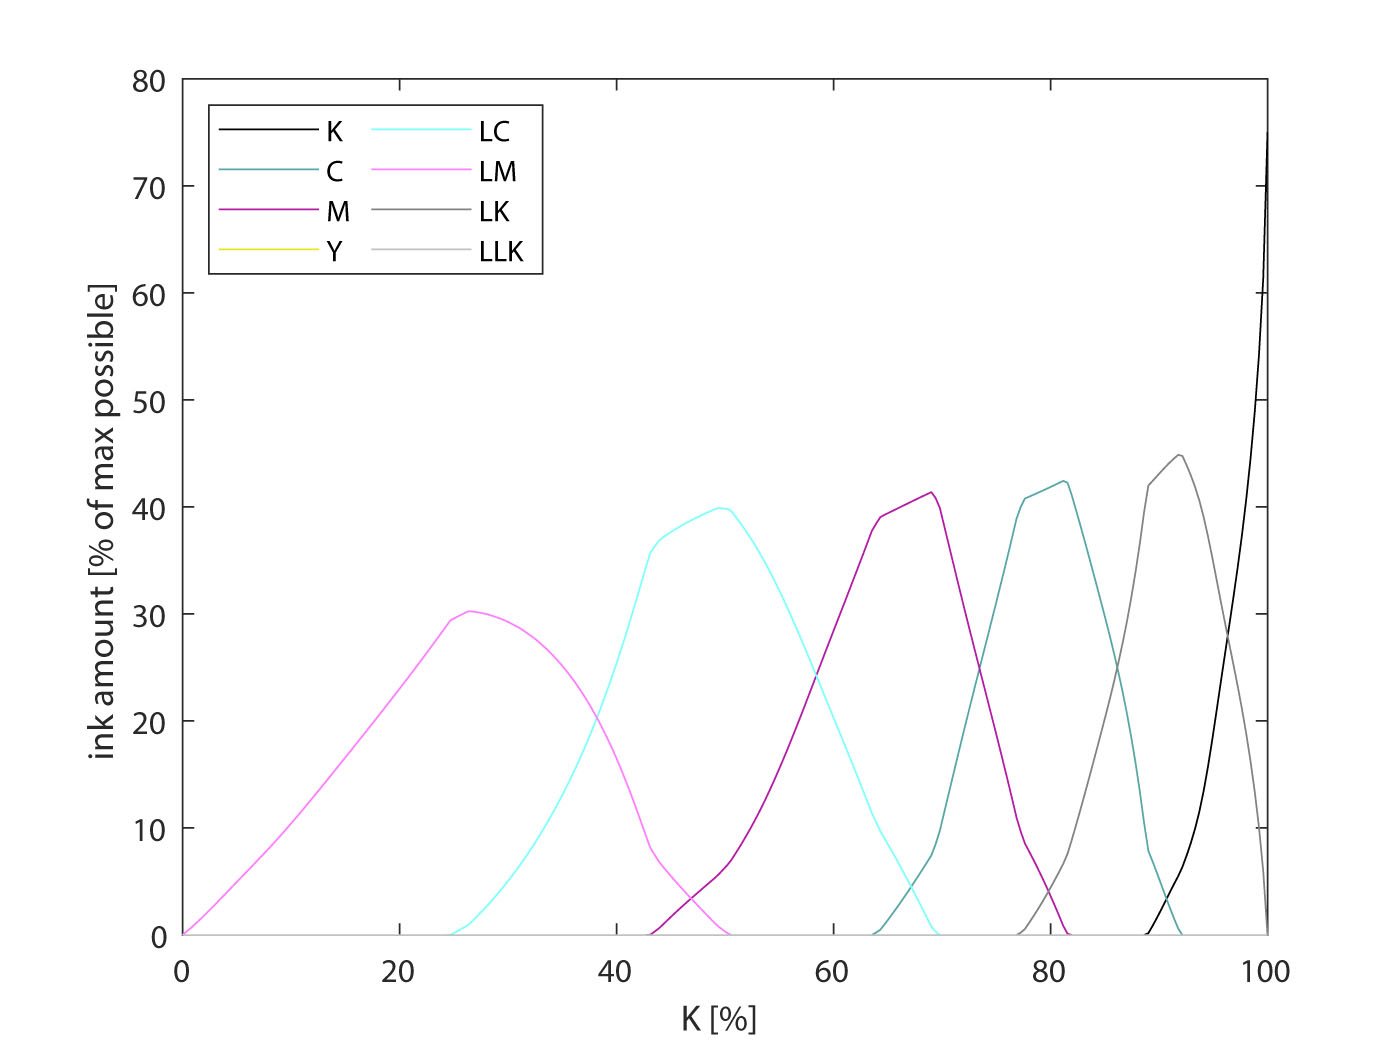
The next step was to create a profile from scratch using only Carbon ink. According to the QuadToneRip user guide, this requires printing a special calibration image containing step wedges for each individual ink channel. Based on this calibration print, the amount of each gray ink (measured as a percentage of the maximum ink supply the print head can provide) must be matched to the amount of black ink that produces the same lightness (L). This process is somewhat arbitrary since ink saturation is a continuous function of the amount of ink ejected onto the paper. Moreover, diluted light inks may not even reach full saturation at 100%. To determine relative ink values for Hahnemühle Photo Rag 308, I started with a global ink limit of 50%, as suggested by Paul Roark’s profiles. However, using the recommended highlight and shadow settings (6,6), the resulting profile printed much too dark. Besides adjusting highlight-shadow settings (10,10), Roark appears to have brightened the print by shifting the darker inks toward the black end (K → 100%) of the scale (Figure 4a). However, I aimed for a more even distribution of K ranges across the individual gray inks. Achieving this required significantly reducing the ink limits for the gray inks (Figure 4b). Once I achieved a satisfactory step wedge reproduction (where L ∝ 100% - K), I was able to linearize the profile using the standard procedure.
|

|
Next, I created a neutral-printing profile. Initially, I thought I could derive a toner curve from the measured b(L) values of the pure Carbon variant. However, since the scaling was unclear, I instead used the toner curve from one of Paul Roark’s profiles. Because my Carbon profile differed from his, I slightly increased the toner amount in the highlights. The goal was to maintain a Lab b value of approximately b ≈ 2 — matching the warm paper white of HFA Photo Rag 308 — across all gray levels. After four iterations, this kind of neutrality was achieved. Due to the added bluish tones from the LKK channel, the step wedge printed slightly darker than when using the pure Carbon profile. Still, the linearization worked well, with only a minor deviation from linearity, likely unnoticeable in actual prints.
With Hahnemühle Photo Rag 308 and the GCVT ink set, I found that measuring the step wedge after one day of drying produced results nearly identical to those measured after just five minutes. This can significantly speed up the process. But for highest accuracy, a longer drying time is recommended. The GCVT ink set includes matte black in two channels, K and Y, specifically for printing on watercolor paper (such as Arches). Since two MK inks are unnecessary for inkjet paper, one could alternate between K and Y for standard inkjet printing to consume the matte black from the Y channel if needed.
In summary, Carbon printing with custom gray inks is manageable with careful and methodical execution. My experience so far has been highly rewarding. For the right subjects, pure Carbon prints on Hahnemühle Photo Rag 308 can be stunning. I also appreciate neutral prints on glossy or satin papers, where a warm Carbon profile enhances the dark grays. The ability to print on both matte and glossy papers with the same ink set — along with the option to fine-tune tonality by using different profiles for highlights, midtones, and shadows—offers exciting possibilities for black-and-white photography enthusiasts.
January 2025