Drucke zeigen einen Magenta-Farbstich
Es gibt mehrere Gründe, warum Drucke einen Farbstich aufweisen können. In meinem Fall begannen die Ausdrucke meines Epson R2880 plötzlich, einen leichten Magenta-Farbstich zu zeigen. Da ich ein oder zwei verstopfte Düsen bemerkte, führte ich eine automatische Düsenprüfung und -reinigung (C) durch. Danach zeigte die Düsenprüfung, dass alle Düsen korrekt funktionierten. Interessanterweise trat der Farbstich direkt nach der scheinbar erfolgreichen automatischen Düsenprüfung und -reinigung (C) auf.
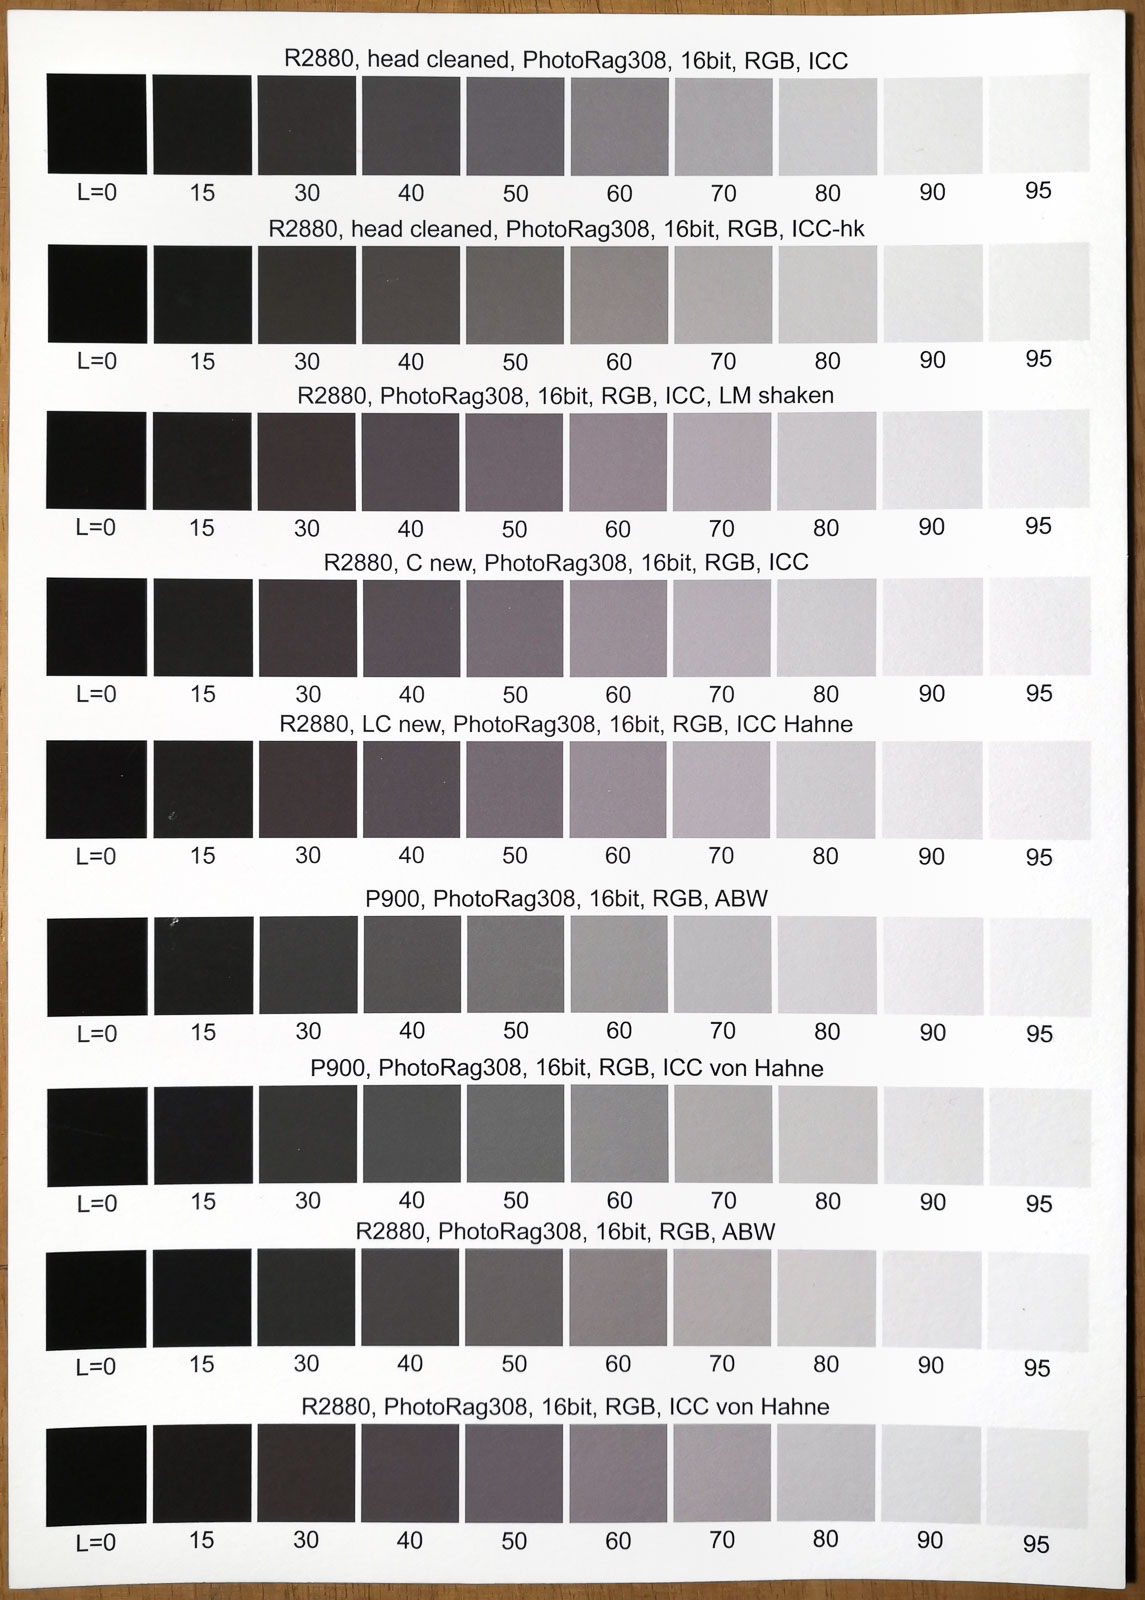
Der Farbstich des R2880 wurde deutlich, als ich dasselbe Bild mit dem Epson P900 verglich. Um das Problem zu identifizieren, erstellte ich eine 10-stufige Grauskala (16-Bit ProPhotoRGB) und druckte diesen Test aus Photoshop (unter Windows 10) auf Hahnemühle Photo Rag 308 Papier. Verwendet wurden die Druckertreiber v6.63 (R2880) und v6.80 (P900). In Photoshop wählte ich folgende Einstellungen: Photoshop verwaltet Farben, Normaler Druck, und Relativ kolorimetrisch. In den Druckertreibereinstellungen wählte ich Velvet Fine Art Papier, Farbe und Keine Farbverwaltung.
Wie in Abbildung 1 dargestellt (Foto links, aufgenommen mit einem Smartphone), erscheinen die Grautöne des P900 nahezu neutral, sowohl bei Verwendung des ICC-Profils von Hahnemühle (Reihe 7 von oben) als auch im ABW-Modus des Druckers (Reihe 6). Beim R2880 hingegen ist ein Magenta-Farbstich in den Mitteltönen deutlich sichtbar, insbesondere bei Verwendung der ICC-Profile von Hahnemühle (Reihen 3, 4, 5 sowie 8 und 9). Auch ein benutzerdefiniertes Profil, erstellt mit einem ColorMunki Photo (nicht abgebildet), zeigte ähnliche Ergebnisse. Der Wechsel des R2880 in den ABW-Modus reduzierte den Farbstich nur geringfügig. In allen Fällen war die Düsenprüfung unauffällig (nicht gezeigt).
Zur Quantifizierung des Farbstichs habe ich die gedruckten Farben mit dem ColorMunki Photo gemessen. Abbildung 2 zeigt die 'a'- und 'b'-Werte für vier Szenarien: (R2880, ICC, orange), (R2880, ABW, rot), (P900, ICC, grün) und (P900, ABW, blau), wie in den unteren vier Reihen des obigen Fotos mit den Graustufen dargestellt. Die 'b'-Werte sind gegen die 'a'-Werte aufgetragen. Entlang jeder Linie variiert die Helligkeit von Schwarz (L=0, markiert mit 'x' oder 'o') bis L=95. Die Punkte zeigen die gemessenen (a,b)-Werte des Graupatches mit dem nominalen Lab-Wert (L, a, b) = (50, 0, 0). Der deutlichste Farbstich tritt bei (R2880, ICC) auf, dargestellt durch den orangen Punkt, bei dem der Patch mit dem Sollwert (L, a, b) = (50, 0, 0) als (L, a, b) = (49, 5.4, -1.4) gedruckt wurde. Abweichungen von der Neutralität (a = b = 0) im Bereich von a = 3 bis a = 5 sind klar sichtbar.
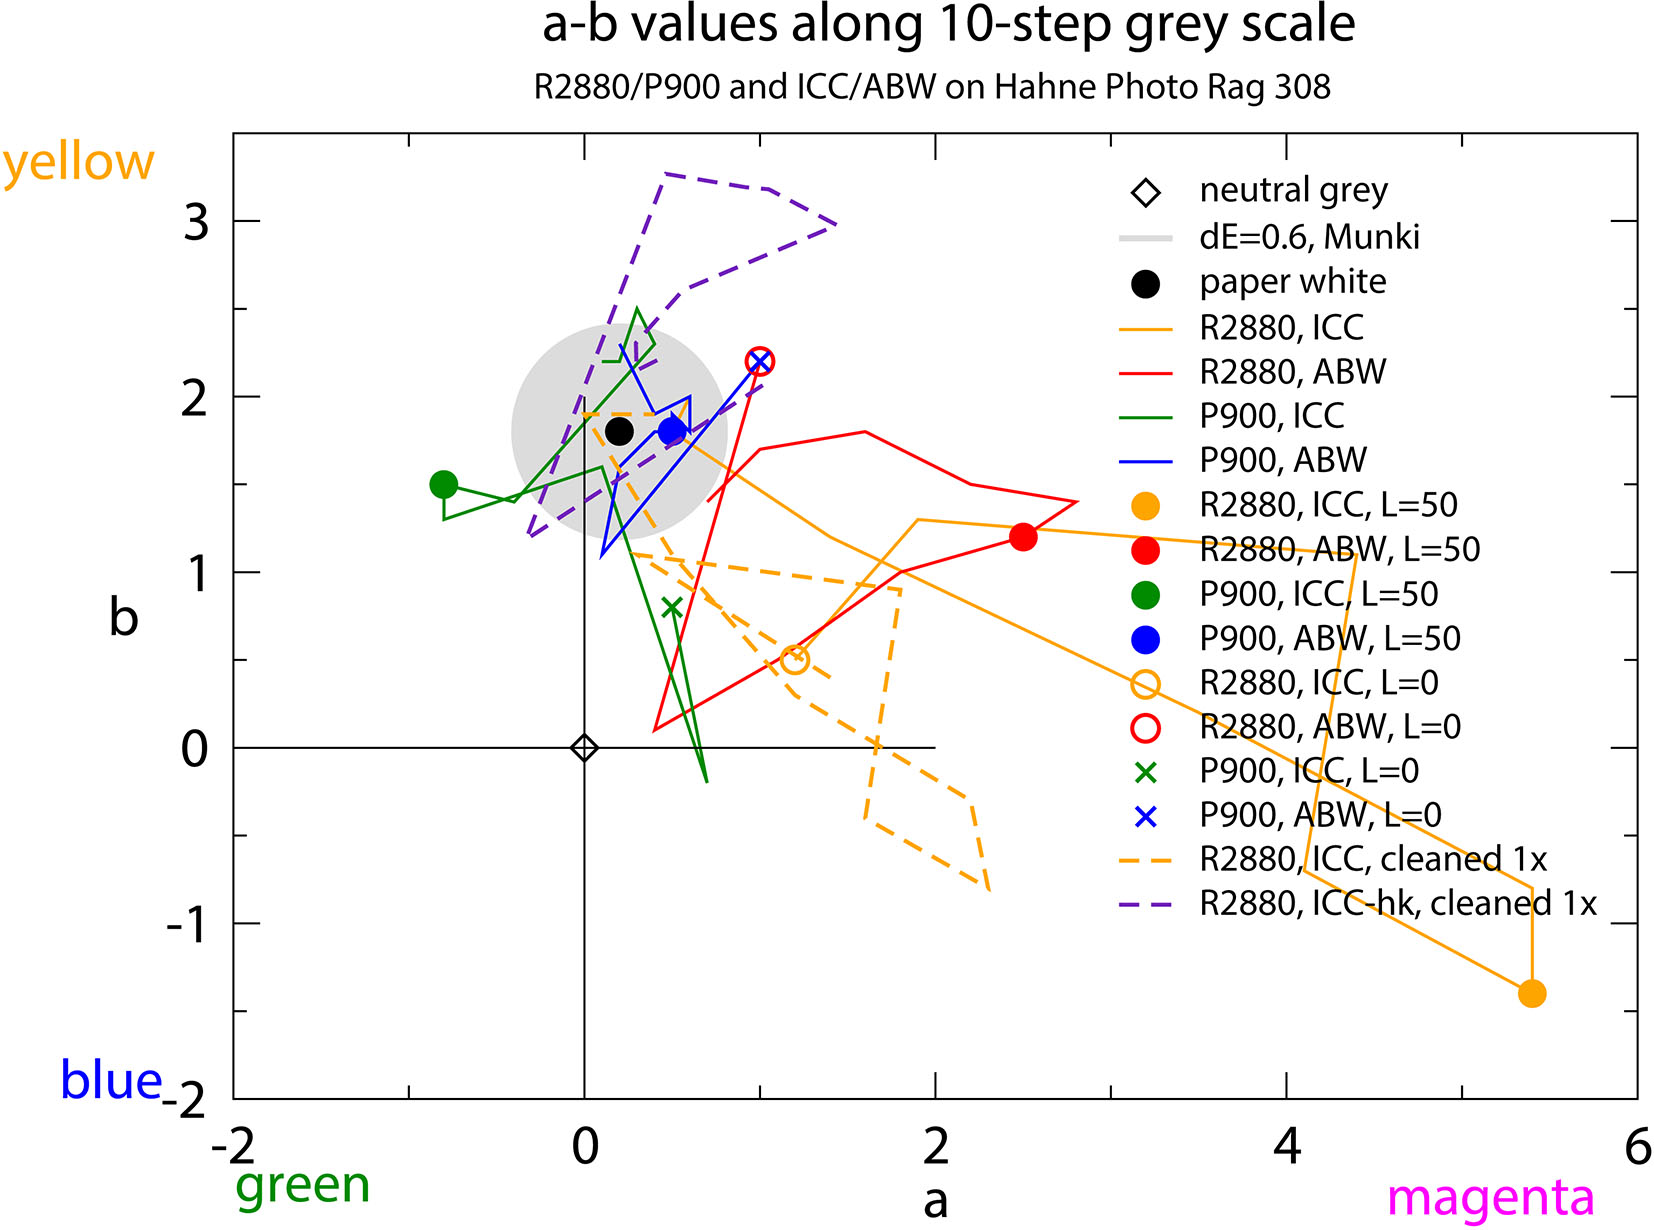
Die Daten für den P900 liegen relativ nahe am gemessenen Papierweiß des Hahnemühle Photo Rag 308 (dargestellt durch den schwarzen Punkt, Lab=(96,0.2,1.8)). Die graue Scheibe zeigt den typischen Fehler des ColorMunki Photo an (ein Wert von ΔE=0.6 wurde gefunden).
Folgende Schritte habe ich unternommen:
- Da die Light Cyan (LC)-Patrone fast leer war, habe ich sie ersetzt. Das führte jedoch zu keiner wesentlichen Änderung.
- Dann habe ich den früheren Treiber v6.62 für den R2880 wieder installiert und die Light Magenta (LM)-Patrone geschüttelt, die noch ziemlich voll war. Auch das brachte keine Verbesserung.
- Danach ersetzte ich die Cyan (C)-Patrone, die zu etwa 20 % aufgebraucht war. Auch das führte zu keiner Verbesserung.
- Anschließend führte ich eine Kopfreinigung (H) durch (nicht die automatische Düsenprüfung und -reinigung (C)) und druckte die Grauskala mit meinem eigenen ICC-Profil (ICC-hk in Abb. 1 und 2). Das war erfolgreich.
- Danach druckte ich die Graustufen mit dem generischen Hahnemühle-ICC-Profil, und das Ergebnis war ebenfalls sichtbar gut.
Nach der Kopfreinigung (H) habe ich die Graupatches sowohl mit dem generischen ICC-Profil des R2880 (Reihe 1) als auch mit meinem eigenen ICC-Profil (Reihe 2) gemessen. Die Ergebnisse sind als gestrichelte Linien im Diagramm dargestellt. Das eigene Profil zeigt leichte Ausflüge in den Gelbbereich (violette Linie), während das generische Hahnemühle-Profil eher einen bläulich-magentafarbenen Stich erzeugt (orange gestrichelte Linie). Die Genauigkeit der Grauwiedergabe des P900 mit dem generischen ICC-Profil ist vergleichbar mit der des R2880 unter Verwendung meines Profils. Wie zu erwarten, verbessert sich die Neutralität durch die Nutzung des Advanced Black and White-Modus (ABW) des P900 (blaue Linie). Einige Abweichungen von der Neutralität bleiben bei Verwendung der ICC-Profile bestehen, sind aber angesichts der Farbabweichung des Papierweißes (ΔE≈2) akzeptabel.
Fazit: Die Kopfreinigung (H) hat das Problem mit dem Magenta-Farbstich weitgehend behoben, obwohl die anfängliche automatische Düsenprüfung und -reinigung (C) das Problem offenbar ausgelöst hat. Wahrscheinlich muss ich einfach mehr drucken ...
Im November 2022
Updates
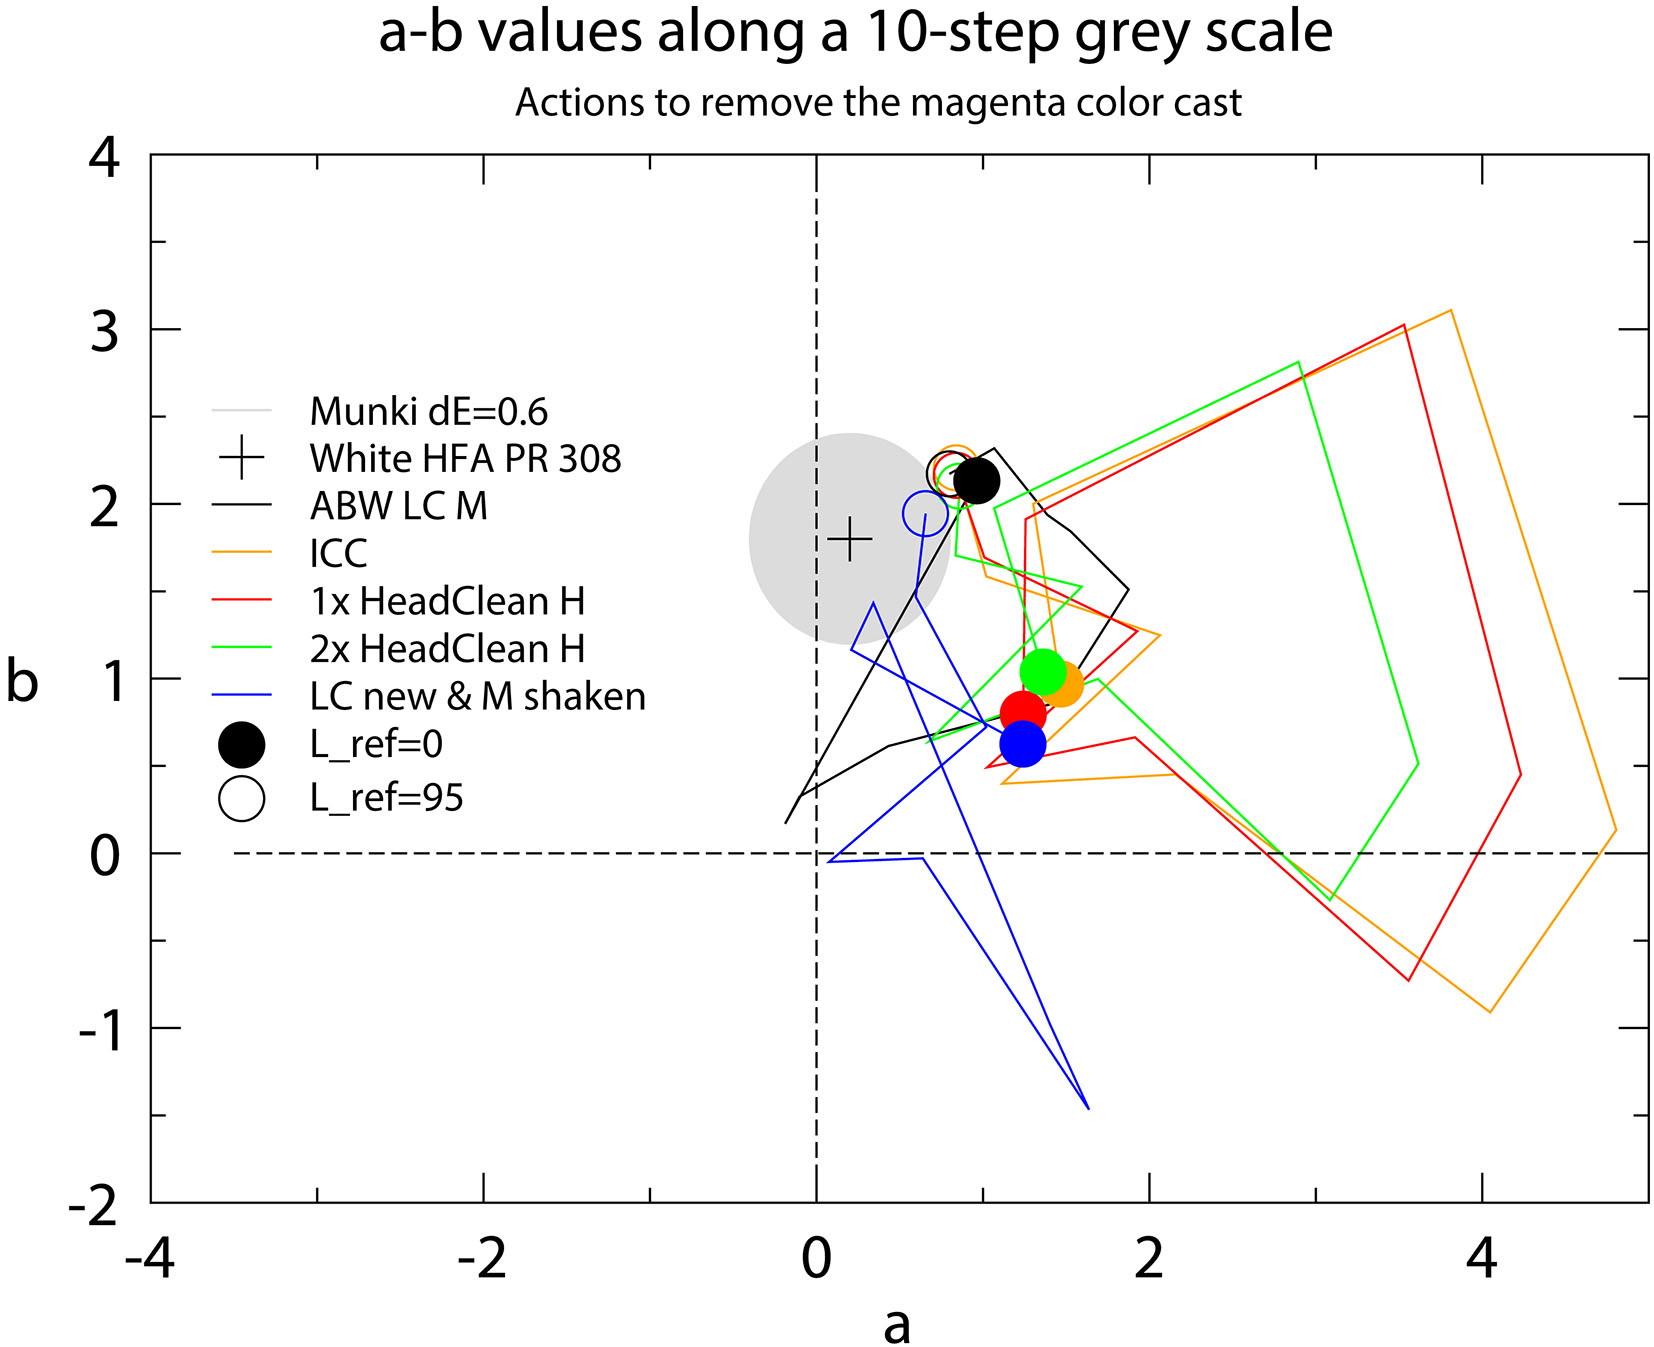
Unterbrochene Linien im Düsentestmuster des R2880 lassen sich in der Regel leicht beheben. Doch aufgrund seltener Nutzung (ich verwende derzeit hauptsächlich den P900) kehrte der Farbstich plötzlich zurück – trotz eines perfekten Düsentestmusters. Wie in Abbildung 3 zu sehen ist, wurde der anfängliche Magenta-Stich (orange Linie) durch eine Kopfreinigung (H) reduziert (rote Linie) und durch eine zweite Reinigung weiter verringert (grüne Linie). Die Verbesserung durch wiederholte Reinigungen ist jedoch langsam. Nach dem Austausch einer fast leeren LC-Patrone und dem Schütteln der M-Patrone wurde der Farbstich deutlich geringer (blaue Linie in Abbildung 3). Wie zu erwarten liefert der ABW-Modus das beste Ergebnis (schwarze Kurve), auch wenn gewisse Tonwertabweichungen bleiben.
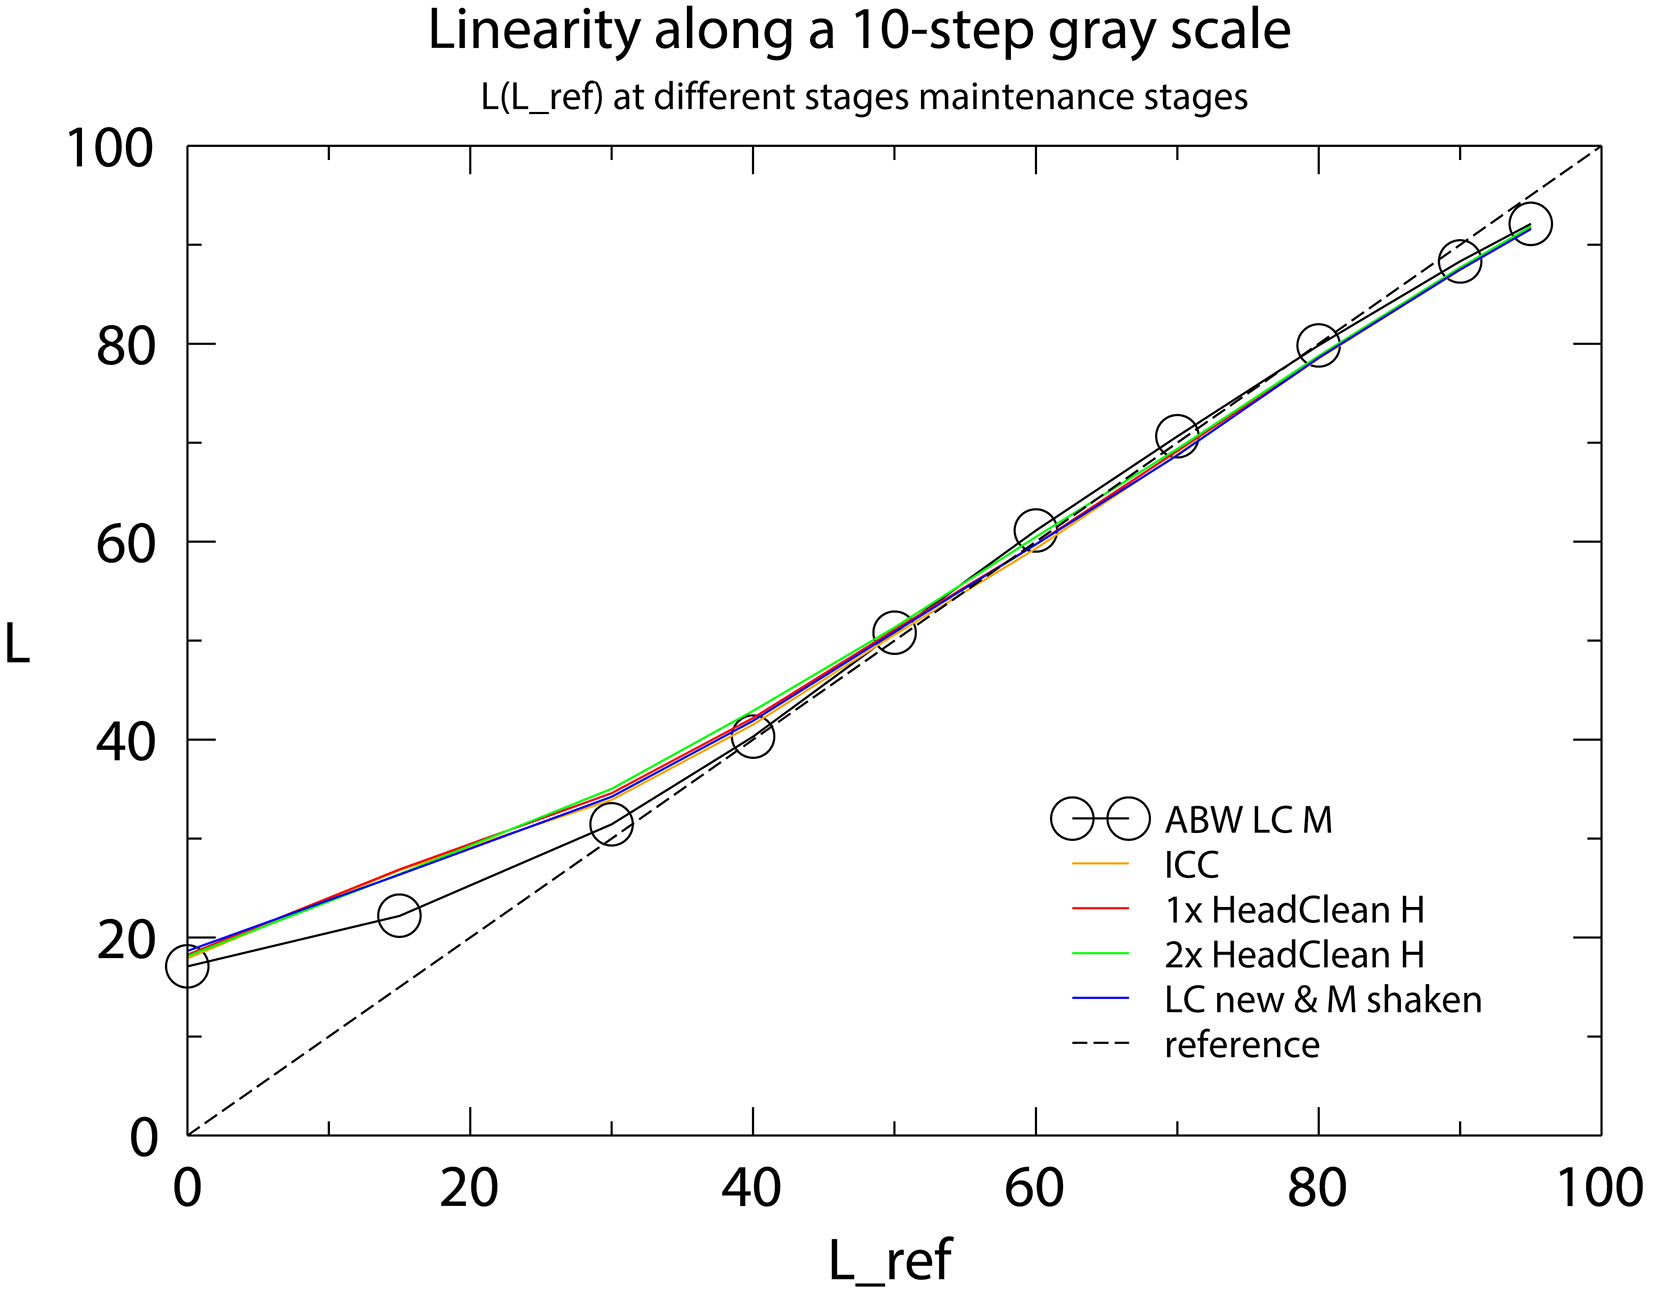
Abbildung 4 zeigt die Kurven der Lab-Werte L. Während die L-Werte vom Farbstich kaum beeinflusst werden, ist die Linearität der Kurve im Advanced Black and White Mode (ABW) deutlich besser. Die minimal und maximal erreichbaren L-Werte auf Hahnemühle Photo Rag 308 sind typisch (siehe Lichtbeständigkeitstests von Aardenburg).
März 2024
Aufgrund seltener Nutzung druckte mein R2880 plötzlich mit einem grünlichen Farbstich (ΔE ≈ 4.5). Auch im ABW-Modus war er leicht sichtbar (ΔE ≈ 2). In diesem speziellen Fall konnten wiederholte Kopfreinigungen (H) das Problem nicht lösen. Aber nach dem Austausch der fast leeren Light-Magenta-Patrone durch eine neue verschwand der Farbstich teilweise. Offenbar wurde nicht genug Light Magenta aufgetragen. Ein leichter bläulicher Stich in den Mitteltönen bleibt (ΔE ≈ 1.5, a ≈ -1.5). Die Cyan-Patrone ist ebenfalls fast leer ...
Prints Show a Magenta Color Cast
There are several reasons why prints may exhibit a color cast. In my situation, the prints from my Epson R2880 suddenly started showing a slight magenta color cast. Since I noticed one or two clogged nozzles, I performed an Auto Nozzle Check and Cleaning (C). Following that, the nozzle check indicated that all the nozzles were working properly. Interestingly, the color cast seemed to have appeared right after the apparently successful Auto Nozzle Check and Cleaning (C).
The color cast from the R2880 became noticeable when I compared the same image printed on the Epson P900. To identify the problem, I created a 10-step grayscale (16-bit ProPhotoRGB) and printed this test from Photoshop (on Windows 10) using Hahnemühle Photo Rag 308 paper. The printer drivers used were v6.63 (R2880) and v6.80 (P900). In Photoshop, I set the following preferences: PS Manages Colors, Normal Printing, and Relative Colorimetric. In the printer driver settings, I selected Velvet Fine Art Paper, Color, and No Color Management.
As depicted in figure 1 (photo on the left taken with a smartphone), the grays from the P900 appear almost neutral when using both the ICC profile of Hahnemühle (row 7 from the top) and the printer's ABW mode (row 6). However, in the case of the R2880, a magenta color cast is evident in the mid-tones, especially when using the ICC profiles provided by Hahnemühle (rows 3, 4, 5, and 8, 9). Even when using a custom profile created with a ColorMunki Photo (not shown), similar results were obtained. Switching the R2880 to ABW mode only slightly reduces the color cast. In all cases, the nozzle checks appeared fine (not shown).
To quantify the color cast(s), I measured the printed colors using the ColorMunki Photo. Figure 2 below illustrates the 'a' and 'b' values for the four scenarios: (R2880, ICC, orange), (R2880, ABW, red), (P900, ICC, green), and (P900, ABW, blue), as shown in the lower four rows of the above photo with the gray steps. The 'b' values are plotted against the 'a' values. Along each line, the brightness varies from black (L=0, indicated by the symbols 'x' or 'o') to L=95. The dots indicate the (a, b) values of the measured color for the gray patch with the nominal Lab value (L, a, b) = (50, 0, 0) (refer to the figure above). The most significant color cast occurs in the case of (R2880, ICC), represented by the orange dot, where the color of the patch with the nominal value (L, a, b) = (50, 0, 0) prints as (L, a, b) = (49, 5.4, -1.4). It is evident that deviations from neutrality (a = b = 0) on the order of a = 3 to a = 5 are clearly visible.
The data for the P900 are relatively close to the measured paper white of Hahnemühle Photo Rag 308 (represented by the black dot, Lab=(96,0.2,1.8)). The solid gray disk should indicate the typical error of the ColorMunki Photo (I came across a value of ΔE=0.6).
Here are the steps I took:
- Since the light cyan (LC) ink cartridge ran low, I replaced it. But this did not yield any significant change.
- Then, I reverted back to the earlier driver version 6.62 for the R2880 and shook the light magenta (LM) cartridge, which was still quite full. However, there was no improvement.
- Then I also replaced the cyan (C) cartridge which was consumed up to 20%. This did not lead to any improvement either.
- Subsequently, I performed a Head Cleaning (H) (not the Auto Nozzle Check and Cleaning (C)) and printed the gray scale using my own custom ICC profile (ICC-hk in figs. 1 and 2). This was successful.
- After that, I printed the gray step using the generic Hahnemühle ICC profile, and the result was visibly good as well.
Following the Head Cleaning (H) I measured the gray patches using the generic ICC profile for the R2880 (row 1) and using my own custom ICC profile (row 2). The results are shown as dashed lines in the plot. The custom profile makes slight excursions into the yellow range (violet dashed), while the generic Hahnemühle profile produces a more blue-magenta cast (represented by the orange dashed line). The accuracy of the reproduction of the grays by the P900 with the generic ICC profile is similar to that of the R2880 using my custom profile. As expected, the neutrality is improved when utilizing the Advanced Black and White mode (ABW) of the P900 (blue line). Some deviations from neutrality persist when using the ICC profiles. But these appear to be acceptable considering the color deviation of the paper base from pure white, which is approximately ΔE=2.
In conclusion, the Head Cleaning (H) has resolved the magenta color cast issue to a large extent, despite the initial Auto Nozzle Check and Cleaning (C) seemingly triggering the problem. Most likely I need to print more...
November 2022
Updates
Any broken lines in the nozzle check patterns of the R2880 are usually removed easily. However, owing to infrequent printing (I am mainly using the P900 these days) the color cast returned suddenly, despite of a perfect nozzle check pattern. As can be seen from figure 3, the initial magenta cast (orange line) is reduced by one head cleaning (H) (red line), and further by a second head cleaning (green line). But the progress obtained by repeated head cleanings is slow. After replacing an almost depleted LC cartridge and shaking the M cartridge the color cast has become much less (blue line in figure 3). As expected, the ABW mode yields the best result (black curve), even though some tonal deviations remain.
Figure 4 shows the curves for the Lab value L. While the L values are not much affected by the color cast, the linearity of the curve for the Advanced Black and White Mode (ABW) is much better. The minimum and maximum values of L which can be achieved on Hahnemühle Photo Rag 308 are typical (see the light fade tests of Aardenburg).
March 2024
Due to infrequent use my R2880 also suddenly printed with a greenish color cast (ΔE ≈ 4.5). It was also slightly visible when using the ABW mode (ΔE ≈ 2). In this particular case, repeated head cleanings (H) did not solve the problem. But after replacing the almost depleted light magenta cartridge by a newer one, the color cast partly vanished. Obviously, not enough light magenta had been layed down on the print. It remains a minor bluish cast in the midtones (ΔE ≈ 1.5, a ≈ -1.5). The cyan cartridge is also almost depleted ...
October 2024